

Good posture is essential to good riding, and it prolongs the health of your back! Pilates can help you achieve and maintain correct posture in the saddle.
Do you often hear corrections while you’re riding? “Sit up straight!” or “Keep your shoulders back, chest up!” You believe these cues are meant to correct your posture. But do you really understand good posture? Do you know what it feels like in your body? Let’s take a look at rider posture and some pilates based exercises for postural awareness and support.
Posture and alignment
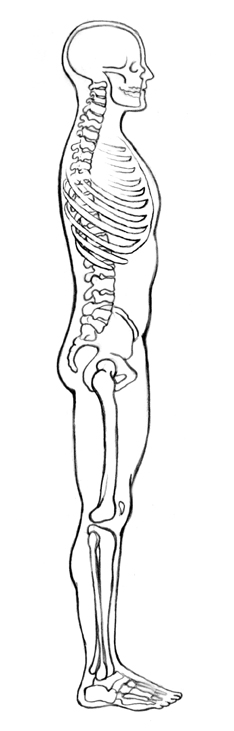
Good posture is the proper alignment of the vertebrae in your spine. Figure 1 shows that the spine is a series of stacked bones or vertebrae. These bones are not stacked in a straight line, but form curves at the neck (or cervical spine), the mid-back (or thoracic spine), at the low back (or lumbar spine), and at the sacrum. These curves promote shock absorption and mobility of the spine. The lowest part of the pelvis, the ischial tuberosities or seat bones, is the part we feel when seated in the saddle or on a firm surface. Good posture is when the spine exhibits its normal curves; this position is called “neutral spine” or “neutral pelvis” (Fig 2).
The neutral spine
Awareness of optimal spine and pelvic alignment is important for two reasons.
1. Neutral spine is the position of most efficient balance. In fact, in the absence of spinal or muscular abnormalities, while at rest, the position of proper posture can be achieved with minimal muscle work. Once we start moving, however, the preservation of posture requires muscle activity, especially while on the back of a horse. Activating the deep muscles of the abdomen and back are vital to supporting good posture. These muscles work cooperatively to keep the trunk upright and balanced by creating a deep, elastic corset for the spine. Without these muscles for support, it is common for riders to grip with their leg muscles or have tension in the shoulder girdle as they struggle for balance and stability on the horse. This leg and shoulder tension then interferes with the horse’s movement and the rider’s communication with the horse.
2. The second reason neutral spine, or correct posture, is best for riding is that it is the healthiest position of the spine. Correct spine alignment minimizes excessive movement, stress and strain on the ligaments and intervertebral discs of the spine.
How posture affects performance
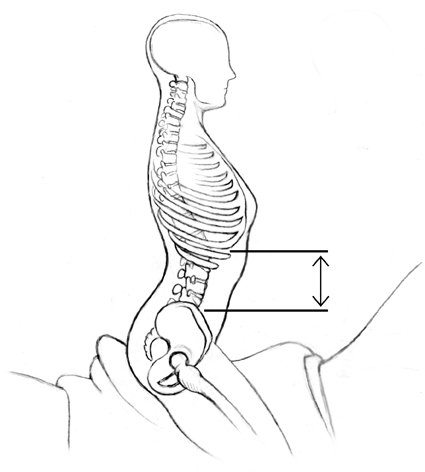
Notice in Figure 1 that since the spine is connected to both pelvis and ribcage, the position of the spine, rib cage and pelvis are all related and affect each other. When the spine is arched or extended, either the top of the pelvis tips forward and/or the sternum lifts up — the distance between the pelvis and ribcage in front increases (Figure 3). When the spine is rounded or flexed, the top of the pelvis tips back and/or the sternum dips down — the distance between the ribs and pelvis in front decreases (Figure 4).
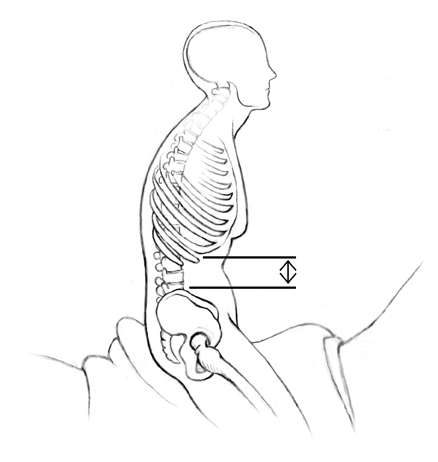
- The arched or extended posture is seen in about 35% of riders I have worked with. These riders tend to seek support and balance from their arms and shoulders rather than their center. As a result, balance may be precarious. The muscles of the upper back and shoulder tend to be stiff and tight, hence elastic contact with the horse is difficult. This posture is often accompanied by a thigh that grips up and in on the saddle knee rolls. Clearly, arm and leg suppleness and movability are compromised, so giving clear aids is difficult.
- The rounded or flexed posture is seen in about 15% of riders I have worked with. These riders also lack awareness of and stability at their center, but the excess tightness tends to round the shoulders forward and close off the front of the body (a fetal position). This posture is often paired with excessive tension in the gluteal (butt) muscles. Again, balance is precarious, and excess tension in the shoulder and hip joint regions preclude moving freely with the horse.
- A rider with stable and balanced posture while riding looks graceful and supple. I would suggest, however, that like a ballerina, that pleasing look of balance and effortlessness is not easy and takes body awareness, muscle activity and control. With focus on balance and posture, the rider becomes more attuned to the movement of the horse and can influence that movement in subtle ways. In the end, good riding becomes energy management of the horse. The horse puts energy into the rider; the rider must not be put off balance by this energy, but channel it in the desired way (forward, upward, through transitions, etc.). Considering that the bulk of this energy management occurs in the rider’s trunk or torso, awareness and support of posture and alignment is necessary for efficient and beautiful riding.
Core exercises for better posture
Core exercises work the deep muscles of the abdomen and back, creating a deep elastic corset for your spine. Some people need emphasis on abdominal muscle work. If you tend towards an arched posture, active engagement of the abdominal muscles will pull the rib cage and pelvis closer together and bring the spine into alignment (changing Figure 4 to Figure 2). If you are someone with a rounded posture, active engagement of the muscles of your back will pull the rib cage and pelvis apart to better spine alignment (changing Figure 3 to Figure 2). Off-horse exercise is extremely useful to help you develop body awareness, strength and connection of your core muscles so you can put them to work to keep you in good posture and balance in the saddle.
Pilates exercises for postural support and awareness

Postural awareness– finding neutral alignment
Objective: To feel the alignment of the vertebrae and perceive the normal curves in your spine.
- Lie on the floor or a mat, knees bent, feet flat on the floor, hip-joint width apart.
- Release the muscles of your back and let the weight of your body sink onto the floor (without pressing or forcing any part of your back onto the floor).
- Note where you feel the weight of your body touching the floor. When the spine is in neutral alignment with its normal curves, the weight contacts the floor in three places: at the back of your pelvis (sacrum), around your shoulder and shoulder blades, and at the back of your head. There is usually little weight contacting the floor behind your waist and your neck.
This exercise describes the normal curves of your spine. Everyone is slightly different, but the point is that your back is not completely flat.
Pelvic rocking
Objective: To explore how spine alignment changes with small movements of your pelvis.
- Lie on the floor or a mat, knees bent, feet flat on the floor, hip-joint width apart, in neutral alignment.
- Take an easy inhale breath, breathing into your lateral rib cage.
- On the exhale breath, scoop in your abdominal muscles to move the top of your pelvis toward the floor (posterior pelvic tilt or pelvic tuck), flattening your lower back.
- On the next inhale breath, move the top of your pelvis away from the floor (anterior pelvic tilt), arching your back slightly so your lower back comes off the floor.
- Slowly alternate flattening and arching your lower back six to eight times, inhaling as you arch your spine, exhaling as you flatten your spine onto the floor.
- Gradually decrease your range of motion until, like a pendulum moving more and more slowly, your lower back comes to rest. This position is likely very close to your neutral spine alignment.
When your spine is in neutral alignment, the plane defined by three bony points—your pubic bone and the prominent bones on the right and left sides of your pelvis—will be parallel to the floor. When you stand, or sit in the saddle, this plane is perpendicular to the floor.
Once you have found neutral spine alignment, you need to keep your spine in this position despite being on a moving horse! Support of good posture on horseback not only keeps your spine in a healthy position but also provides the most efficient position from which to achieve balance.
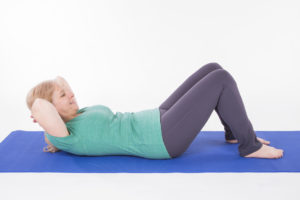
Abdominal curls on the mat
Objective: To strengthen your deep abdominal muscles
- Lie on the floor in neutral spine alignment, knees bent, feet flat on the floor hip-joint width apart.
- Place your hands behind your head or neck.
- Take a normal breath in and as you exhale, scoop in your lower abdomen, and peel your upper body off the floor in a curl. Inhale as you roll back down.
- Repeat eight to ten times.
Keep your abdominal muscles scooped in as you curl up. Keep your fingers soft behind your head; don’t pull yourself up with your arms. Avoid pushing your lower back into the mat by tucking your pelvis. Allow your back to lengthen. Feel your neck lengthen as you round your head forward in the curl, leading with your forehead. Curl up until just the bottom of your shoulder blades touches the floor. Keep the movement smooth, not jerky.
Continue breathing throughout the movement. Feel how your ribcage comes closer to your pelvis during the exercise. Done this way, the exercise strengthens the deep abdominal muscles. If your abdominal muscles bulge out, you are using the more superficial muscles, making the exercise less useful.
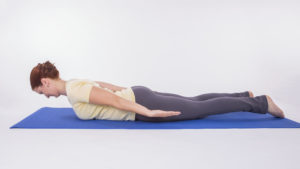
Back muscle strengthening – spine extension on the mat
Objective: To strengthen the deep muscles of your mid and upper back.
- Lie on the floor on your stomach, resting your forehead on a towel if needed for comfort.
- Place your arms by your sides with palms up.
- Take an easy inhale breath, and on the exhale breath, pull your abdominal wall up off the floor (this should not be a visible movement—just a pulling in of your abdomen to support your lumbar spine).
- On the next inhale breath, bring your shoulder blades together and slowly lift your upper body off the floor. The muscles to lift your upper body should be the deep mid and upper back muscles.
- Exhale as you rest your upper body back down.
- Repeat four to six times.
Initiate the movement with your shoulder blades coming down your back toward the center of your body, not from your neck. Feel that you are keeping your head and neck in alignment with the rest of your spine. Also feel as if your back is getting longer, reaching away from your pelvis.
If this exercise causes low back pain, reduce the range of motion and seek support from your scooped-in, deep abdominal muscles, or avoid the exercise until you can get expert feedback. Follow the exercise set with the child’s pose back stretch (next).
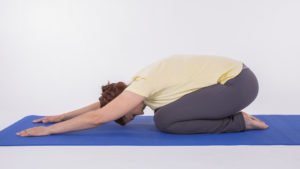
Child’s pose back stretch
Objective: To be done after each spine extension or strengthening exercise sequence.
- Start on your hands and knees. Sit back toward your heels and lower your forehead toward the mat.
- Either reach your arms “overhead”, resting your hands on the floor, or keep them by your sides.
- Use your breath to stretch your back muscles. As you breathe in, feel how expanding your ribcage stretches your back muscles. As you exhale, focus on scooping in the abdominal muscles to support the stretch of your lower back muscles. Hold for several breaths.
- Walk your hands over to your right side, stretching the left side of your body. Breathe into the left ribcage two to three times to facilitate the stretch.
- Walk your hands over to your left side, stretching the right side of your ribcage. Breathe into the right ribcage two or three times to facilitate the stretch.
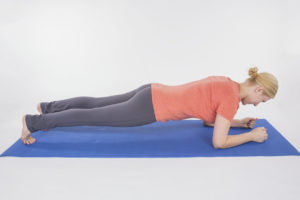
Plank on knees or feet
Objective: To integrate abdominal and back muscles.
- Lie on your stomach on a mat.
- Bend your elbows and keep them by your sides and place your forearms on the mat.
- Bend your knees so your lower legs are off the floor (plank on knees), or keep your legs straight (plank on feet).
- While keeping your shoulders anchored, lift yourself onto your forearms, and onto either your knees or feet, into a suspended plank position. Seek a long and neutral spine position and avoid pulling your shoulders up around your ears. Try to keep your pelvis level, not pushed up to the ceiling.
- Hold this position for 30 to 60 seconds.
If plank on your feet is too challenging, alternate between your feet and knees for the 30 to 60 seconds of the exercise. Gradually build up the time you can hold the position on your feet.


